
Have you been thinking about installing a wallpaper mural but are not sure how? I’ll show you how we installed a nursery wallpaper mural over textured walls in our daughter’s nursery in one afternoon!
I’ve been loving the wallpaper murals trend lately and the options are unlimited, from landscape scenes to florals and even custom photos. I thought that our daughter’s nursery would be the perfect room to install a landscape wallpaper mural as the focal point. After spending hours and hours searching for the perfect one, I finally found a beautiful landscape mural on Etsy. I ordered it in a size that was slightly smaller than the wall so that we could frame out the mural on the wall with picture frame moulding and a white border.
Let me show you how how to hang wallpaper mural and specifically, how to install wallpaper on textured walls like we did in just one afternoon!

Note: This post may contain affiliate links, you can find more information in my disclosures here.
Materials
- Wallpaper mural
- Wallpaper adhesive/wallpaper paste (we used Roman’s Pro-543)
- Picture frame moulding (optional)
- Paint (optional)
Tools
- Level
- Pencil
- Measuring tape
- Paint roller
- Paint brush
- Scissors
- Old blanket, old sheet or similar to cover and protect your floors
- Miter saw (optional)
- Brad nailer (optional)
Step 1: Measure and determine mural placement
The first step to install wallpaper mural was to measure the wall and determine the wall mural placement. In our case, we wanted the wallpaper mural to be centered on the wall with a white border around it that would be the same width on the left, top and right.
I measured all four wallpaper panels individually to figure out the total width of our wall mural. I highly recommend doing this in case the actual size of your mural is slightly different from the advertised width!

At this point, we also spread out an old sheet to protect our floors during the installation.

Step 2: Cut panels to size
The width of our mural already worked great to create the white border around it so all we had to do was shorten the length of the panels so the top border would match the sides. I used scissors to shorten each of the four panels by just a few inches:

Step 3: Draw level lines
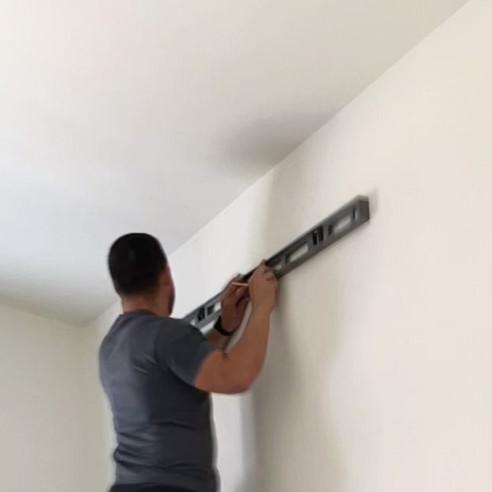
Next, we drew a vertical level line on the left side where the first panel was supposed to start:

Then, we drew a horizontal line where the top of the first panel was supposed to start:
Step 4: Hang the mural panels
This is where things got exciting and we were almost ready to install wall mural! We measured the width of the first panel and applied a generous layer of wallpaper adhesive using rollers and paint brushes to the portion of the wall that the first panel of our wall mural was going to cover:

After that, we got to hang the first panel of our wallpaper mural! We made sure to line it up exactly with the level lines we drew:

We smoothed out the wallpaper and made sure to wipe off any excess wallpaper adhesive that come out on the sides. Next, we trimmed the bottom using a putty knife as a guide along the baseboard and a utility knife to cut the wallpaper:

It was so exciting to see that first panel on the wall!

Next, we applied wallpaper adhesive to the section where the second panel would get installed and hung the second panel making sure that it perfectly aligned with the first panel. I think the hanging of the wallpaper is definitely a two person job because one person can hold the panel while the other person aligns it to make sure it’s level and placed perfectly on the wall.
After hanging that second panel I trimmed it to end right above the baseboard:


We took off the outlet cover to install the third panel:

We turned the breaker off and while we installed the third panel, I cut around the outlet:


Once the wallpaper panel was hung, we installed the outlet cover over it:

After that, we installed the fourth and last panel.

Step 5: Add trim (Optional)
This step is totally optional but we decided to add picture frame moulding around the border of our wallpaper mural.Once I measured and cut the trim to size, I painted it to match the wall color. Then, I installed the trim using a brad nailer:
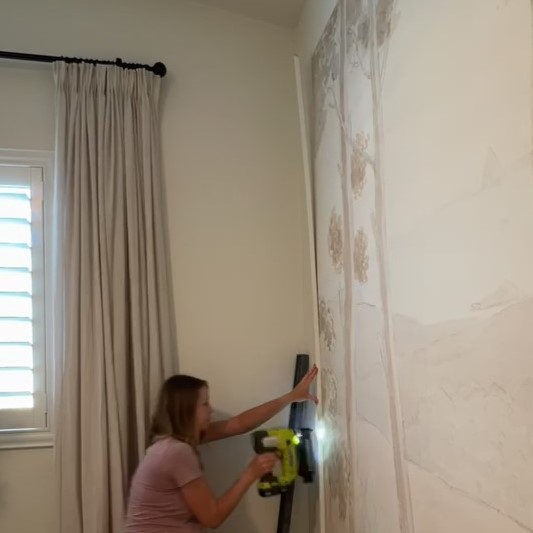
I started at the bottom and held up the level to make sure the trim was still straight and level as I kept nailing it in:


I think the trim is a really great finishing touch!
Here is the mural without the trim:

Here it is with the trim:

I’m so glad I decided to install wallpaper border!
Finished Wallpaper Mural
I’m so excited about how our framed wallpaper mural turned out in our daughter’s nursery and her crib looks so cute against it! Wall murals really are such a great way to spruce up a space, no need to shop for many other decorations.


I think it’s the perfect neutral addition to her nursery. It looks so calming and actually makes the room feel bigger than it is. I also love the faux olive tree in the corner!

I still can’t believe how well the nursery wallpaper mural matches our light white oak floors, the Sherwin Williams Accessible Beige baseboards and our Sherwin Williams Alabaster walls:

We installed a wallpaper mural over our textured walls and you can barely see the texture. I think this is because of the wallpaper paste we used and the fact that we used thick paper wallpaper (vs. peel and stick wallpaper) in our home, both of them combined seem to almost absorb the texture of the wall and flatten it out a bit. It looks great even up close!

I really hope this overview on how to install wallpaper mural was helpful!
Let me know what you think and if you would install a wallpaper mural yourself or consider a wallpaper mural installation in your home!
Tina

Leave a Reply